Hi all and best wishes for a super Granny Square Day! I hope to add to your enjoyment with an easy make: a gift bag made with just one square. You can make it with any granny square and in any size you want.
I have prepared a full tutorial with photos that you can buy as an inexpensive pdf on Ravelry; however, you can find the instructions below.

And to make things merrier let’s have a competition! Post the picture of your granny square bag made with my tutorial on Instagram tagging #supernovacrochet and win a surprise prize! I’ll reward my favourite gift bag among all the contributions received by August 31st, 2019.
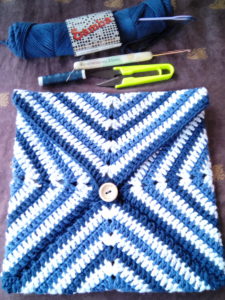
Instructions start here. As I said before, you can make your bag in any size, with almost any kind of granny square. The one pictured here is a solid granny square; you can find the pattern at the end of the instructions if you need them to make a square just like this one.
You will need :
Leftover yarn of any kind
Suitable hook size
Scissors and needle
One button
Yarn to attach button
To start, prepare what you need and lay your granny square flat, wrong side up.
Buttonhole
In your final round of the granny square, take care to make a few more chains in one of the corners to create the buttonhole.
Sewing the bag
Leaving the buttonhole corner up, fold the remaining corners so that they join together. Join the sides starting from the bottom left corner. You can choose whether to crochet or sew the sides of the bag. The picture shows you the kind of stitch you can use to stitch the sides together. If you choose to crochet the sides, you can slip stitch or use a single crochet (UK: double crochet) around. Once you have finished, turn your bag inside out to attach the button.
Attach the button
Now sew the button where the three sides join; use ordinary cotton and a smaller needle.
Pattern for the solid granny square
Round 1: magic ring, chain 3 then in ring: 2dc, 2ch, 3dc, 2ch, 3dc, 2ch, 3 dc, 2ch, join to top of starting chain. Slip stitch to corner. Change colour here if desired.
Round 2: ch3, 2dc, 2ch, 3dc, dc in each of the next 3dcs, repeat to end. Slip stitch to corner. If you want, change colour here.
Folllowing rounds: repeat as desired. Fasten off, weave ends in.
That’s all! Have a lovely #GrannySquareDay2019!
Have a question? Leave a comment and I’ll get back to you asap 🙂